
Hardware Requirements for GBI
In order to use GBI, you are going to need some extra hardware to get the software to work on your GameCube. You must start with a GameCube, preferably one that has a digital output port (Model # DOL-001). You will need the GBP attachment fitted and screwed into the bottom of your GameCube. Then most people purchase a product called SD Media Launcher for the GameCube. The SD Media Launcher, available here, comes with two things. The first is an Action Replay disc, the second a SD-to-Memory Card adapter. Finally, you will need an SD card that is no larger than 2GB in size and some Game Boy, GBC or GBA cartridges to play with.
The Action Replay disc is an unlicensed program that comes on a GameCube mini-disc. Its purpose is to allow you to input and apply cheat codes for your favorite GameCube games. Even though it is an unlicensed disc, it has been manufactured in a special way which can defeat Nintendo's method to limit booting to officially licensed discs (most of the time).
The Action Replay disc has two other special features in addition to self-booting, it can boot other software in addition to itself and it can interact with an SD card plugged into a Memory Card Slot via the SD-to-Memory Card adapter included in the SD Media Launcher package. However, the Action Replay disc only understands FAT16 file systems, so the SD card must be 2GB or less for the disc to recognize the card.
Setting Up the SD Card for GBI
We will use the Action Replay disc to boot GBI, but first we must prepare our card. While the Action Replay can start up GBI directly or through its own browser menu, it is best to use GBI through another piece of homebrew software called Swiss. Swiss is, as its name suggests, the swiss-army knife of GameCube homebrew. Swiss can do many things, it can bypass region detection for official game discs, let you play GameCube games from mini DVD-R backups, from your SD card or via the Broadband Adapter. It can boot into GBI, but its ability to let you set your options from a menu really makes it more convenient to use for GBI than the Action Replay interface alone, which does not give you a menu for setting options.
In addition to Swiss, you will need the GBI package and may want to grab the GBI extras package, available here. If you wish to use the extras package, you should really have a 2GB SD card. From the Swiss archive, extract SDLOADER.BIN and swissrxxx.dol and copy them to the SD card's root directory. Then rename swiss_rxxx.dol to autoexec.dol. This will ensure you boot directly from the Action Replay disc into swiss. If you skip the renaming step you can still execute Swiss manually from the Action Replay menu by selecting swiss_rxxx.dol.
After unzipping and renaming the Swiss files, you must unzip and then copy over the decompressed GBI archive to the root directory if your SD card. If you want to use the extras package, do the same with its package and let it overwrite files.
Running Swiss and GBI
 |
| First you see this, the GameCube boot sequence |
If you've setup your software correctly, then insert the Action Replay card into the GameCube's disc drive, the SD card into the SD-to-Memory Card adapter, the Memory Card Adapter into one of the Memory Slots, a Cartridge into the Cartridge Slot and turn the system on. The GameCube logo will appear, then the Action Replay logo. The screen will go blank for about 30 seconds while the Action Replay logo loads Swiss. When you see the Swiss file browser, then you are ready to start up GBI.
 |
| Then this, the Action Replay logo |
If you are running Swiss on a standard definition CRT, then for the first boot hold the L button on the controller down after the Action Replay logo disappears to instruct Swiss to boot itself in interlace mode. Then when Swiss appears, go to the gears icon on the bottom of the screen by pressing the B button and moving the blue dot over to the circle next to gears. Pressing A will bring you to Swiss' configuration menu. Set Swiss Video Mode to 480i, then set the Configuration Device to SD Card Slot A or Slot B, depending on which slot your Memory Card Adapter is located, then Save & Exit. You can use the Y button to get a description of most Swiss options. While you are here, you should also configure your AVE compatibility for the output equipment you have.
 |
| And finally, we can get something done in Swiss! |
Executable files for the GameCube use a .dol extension. When you see the Swiss file browser, you will see three executable files, gbi.dol, gbihf.dol and gbisr.dol. These execute one of the three different versions of GBI. gbi.dol executes GBI (Standard Edition), the most fully featured version of GBI. gbihr.dol executes GBI High Fidelity Edition, which is geared toward giving the best picture quality. GBI HF is the best choice for high-quality video capture but gives fewer options. gbisr.dol executes GBI Speedrunner Edition, which presents GBI at its most faithful to the GBA's execution speed and is best for playing on a CRT but is also more limited in its options. GBI used to have Standard, Low Latency and Ultra Low Latency Editions, but the features have been reshuffled and rebalanced so much that those labels are no longer properly descriptive for what each Edition is best.
When you select the Edition you wish to use, Swiss will present you with a screen full of options. There is a checkbox to each item and the default option is shown in gray when you first see this option screen. By pressing A on your controller, you can select and option and press left or right on your analog stick or D-pad to cycle through the options. To select an option, leave the option you wish to use on the screen and make sure the checkbox is checked and the text for that option is in white. Then press start on your controller and GBI will execute.
Important GBI Options Common to All Editions
Aspect Ratio - The GBA's native aspect ratio is 3:2, I personally see no reason to change this.
Video Mode - The default video mode is 480i because it is most compatible across all displays. If you are playing on a normal, 15KHz horizontal scan frequency CRT, you will want to select 240p60. GBA games use a native resolution of 240x160, so you will have to deal with borders if you run a GBA game on a GameCube. However, GBA games are intended to run at approximately 60fps in a 240p-style progressive scan mode. 480i will not give you the best picture quality or the best experience.
If you are playing on a CRT VGA computer monitor, the monitor will expect a refresh rate of 31KHz or higher. 240p will usually fail on such monitors, so 480p is a good choice here. You will need the Nintendo Component or D-Terminal Cable or an HDMI GameCube adapter with an appropriate converter to the VGA standard for this to work. Composite, S-Video and RGB cables do not support the progressive scan rates required to display on a CRT VGA computer monitor. 240p120 may also work with these monitors because the refresh rate is double the 15KHz rate of 240p60.
If you wish to connect the GameCube directly to an LCD display, then should experiment with these modes to see what your display will support. The GameCube can support up to 480p progressive but 960i in interlaced mode with GBI. Using this in conjunction with the next mode, Video Oversampling, may give good visual results even in interlaced modes.
Rumble - This option's name is not quite fully representative of what this option does. When enabled, GBI will identify itself to GBA software as a GBP. Some GBA games will support Rumble or alternate colors when played on a GBP. If turned off, GBI will identify itself as a GBA, When GBA Video cartridges detect a GBP, they will not play due to licensing issues, but by turning this option off, they will play on the GBP.
Polling Rate - Because there is an interface between the GBA on the GBP and the controller, there will be added processing time to translate that controller data into what the GBA expects. The Polling Rate tries to cut down on the added lag by sampling the controller at frequent intervals. Keep this at the default unless your controller is not acting properly. The official GameCube wired, Wavebird Wireless and Hori Digital Pad (awesome but pricey) have no issue with the default option. I have heard good things about the most recent revisions to the Raph.net adapters that let you plug in a SNES controller into a GameCube. The Game Boy Advance to GameCube cable will let you use your GBA as the GBI controller and it too has no issues with the default polling rate. The VSync option is the most compatible but the slowest, it only samples a controller once per frame. It is required if you connect an N64 controller to a GameCube using a simple pin adapter.
Color Matrix - The GBC and GBA support 15-bit RGB color, but their screens used phosphors that only allowed for low-saturation colors. When displaying the RGB values that game developers chose for such screens on a standard sRGB monitor, the graphics would look extremely oversaturated. Therefore, the RGB values need to be corrected by applying "color space conversion". "Color Matrix" therefore allows selecting between several color space conversion matrices designed to accurately reproduce the look of the original Game Boy Color, Game Boy Advance, as well as Game Boy Advance games running on the Nintendo DS (pre-Lite), Palm Treo 700p, Sony PSP, and VisualBoyAdvance-M emulator on a standard sRGB monitor or television screen. The "Identity Matrix" is actually misnamed: "Identity" would mean that the RGB values are not modified at all, but because this would produce "odd-looking oversaturated colors when shown as-is" according to Extrems, what he calls "Identity" matrix is actually a conversion matrix that is half-way between a true identity (unmodified) and the "GBA" matrix.
Special Features of GBI Standard Edition
Standard can now essentially replace all the functionality of the official disc. Standard has in-game on-screen controls which can be accessed by pressing the X-button. (Note that I am using these button assignments are the default assignments for the GameCube controller.) When you press the X-button white text giving information such as the display resolution, the X and Y offsets for the active screen and the zoom level are shown and input to the game is blocked until you exit by pressing A or B. L and R will zoom in and out the screen in discrete increments and the Y-button will set the zoom back to default (typically 2x on 480i/p modes). The Z-button will take .png screenshots which are stored on the SD card. You can also shift the active GBA image using the D-pad in this mode. Standard is also the only Edition which can return to Swiss without rebooting the system. Hold down the Start button for one second while the screen controls are on-screen.
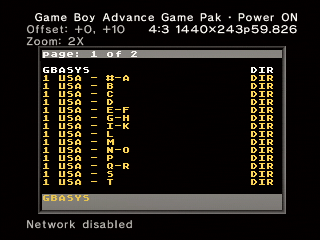
Standard has a feature likely to be appreciated by many. There is a feature which allows you to dump GBA games, the GBA BIOS and GBA cartridge saves. Hold Start and Select while the Game Boy Advance logo is being displayed on-screen. The data will be saved to the SD card. You can also record inputs by pressing the Reset button on the GameCube while the screen controls are being displayed. The dumping utility cannot dump or otherwise work with GB or GBC games.
The final features which Standard supports are the borders from the official disc and the "filter" modes which the official disc can apply to the image. On the Options Menu in Swiss for Standard, you will see a Border option. The numbers displayed correspond to the border numbers from the official disc. Unfortunately, due to a hard limitation in the way the Options Menu handles the number of choices permitted to be selected, only eight borders can be selected via this Menu. Additionally, unlike the official disc, to select a new border, you must exit out of Standard, set a new Border and then boot Standard. Fortunately Standard will allow you to resume your game where you left off.
Standard also has a Filter option with three choices, Normal, Sharp and Soft. Like with the corresponding choices on the official disc, these options will cause little visual difference in most instances. When the Soft filter comes into play are for games that relied on the original handheld LCD's image persistence to create transparency effects. I discussed the effect in my blog article here. Where the original LCDs could rely on the slowness of the panel to respond to new images, Standard and the official disc have to actively blend frames together, which increases latency to about two frames. Like with the Border option, you must exit out of Standard to change the Option in Swiss before returning to Standard.
Benefits and Drawbacks of the Speedrunning and High Fidelity Editions
Both the Speedrunning and High Fidelity Editions sacrifice much in the way of convenience to achieve their goals. You cannot go back to Swiss once you start either Edition to change options, you must reboot the GameCube. You can still change cartridges by holding the Reset button on the GameCube while removing one cartridge and inserting another cartridge with the Ejector lever on the side of the GBP. (The GBP is the only hardware from the Game Boy to the Game Boy Micro which supports hot-swapping cartridges). There are no on-screen controls, everything must be done by the Options or the command line files (I'll explain those below). As a result of this cutting down, there is almost no extra latency in these Edition's default settings added from using a wired controller, whereas Standard and the official disc add at least one frame of lag by their image processing (two frames for the official disc). The original GBA has a refresh rate of 59.7225Hz and these Editions can almost match it at 59.7226Hz, so there will be no visual stuttering perceptible by normal people.
One curious feature that Speedrunning and High Fidelity have that Standard does not is the ability to apply Super Game Boy palettes to Game Boy games. (As a reminder, GBP does work with GB and GBC games). The Super Game Boy allowed the user to apply a four color palette with each palette entry freely selectable from the 15-bit RGB the SNES could display. GBI Speedrunning and High Fidelity also allow this.
Speedrunning replaces the dumping program from Standard with a checksum computation utility, brought up in the same way. This is very useful to show others viewing a video that you are running an unmodified ROM. It works with standalone cartridges and the popular EverDrive GBA X5 and EZ-Flash Omega flash carts. Turn off the Quick Boot feature for the EverDrive GBA X5 and then hit Start + Select when you see the Game Boy Advance splash screen show up after you load your ROM from the EverDrive's menu. You will hear a tone and see the Nintendo® disappear. Continue to hold Start and Select and the Nintendo® will reappear, another tone will sound and you will have your checksum calculation screen. High Fidelity sends you to the ROM dumping utility if you press Start + Select.
High Fidelity has one rather useful feature which is lacking in the other Editions. The Color Space option allows you to select from YCC601, YCC709, YCC2020, RGB709 and RGB2020 if you are using the Nintendo Component or D-Terminal Video Cables. Normally Component Video uses the Rec. 601 color space, but this is not something set hard in stone, at least on the GameCube. If you wish to use a more modern color space like Rec.709 or Rec. 2020, you can. You can also have the GameCube output an RGB color space, which a Datapath capture card may appreciate more than YCC. It should be noted that the GameCube (and Wii) output graphics from the GPU as a form of Component Video (YUV 4:2:2 I think), not RGB. Conversions to RGB (as which happens with PAL GameCubes) can lose color fidelity because the conversion is not 1:1.
In my opinion, the most simple way to capture high quality video with GBI and a Datapath VisionRGB E1/E1s is to use the High Fidelity Edition and set the Video Mode option to 240p60 and the Color Space to RGB709. Set the Input Resolution in vcs to 240x160, the Horizontal Size to 433, the Horizontal Position to 125, the Vertical Position to 58 and the Phase to 28. You may see purple borders outside the active GBA graphics area when you use this method, just position the window until they have been cropped out. Leave other options the same and resize to the size you want. You will need to use Vision to set the Color Domain to RGB (601) to get the colors to remain appropriate and stable. Leave Vision running and if the colors become bizarre, make the Vision window active to revert vcs' Color Domain choice. (vcs does not yet allow you to select Color Domain, and a resolution change can result in vcs defaulting to the incorrect Color Domain.) I would highly advise that if you are capturing footage via OBS to capture the VCS window, the Datapath and OBS may not work properly if OBS tries to capture the Datapath directly.
Improving the Official Disc's Video Quality
By now, despite a few quirks, you should consider the official disc as superseded by GBI for ordinary use. If you still have some attachment to the official disc, then Swiss can help you improve its visual clarity. First, you can use Swiss to boot any software in the standard .iso format. GameCube disc .iso images have a standard size, 1,459,978,240 bytes or 1.35GB. While the Action Replay is limited to FAT16 volumes, Swiss can read FAT32 volumes just fine. You can boot into Swiss with your 2GB card, then swap out the card for a larger card with disc .isos on it and use Swiss to read the larger card and boot disc images off it. Swiss can boot the official disc without an issue.
One booted into the official disc, the software will behave as if the disc were spinning in the drive. Before you boot the official disc image, you should take a moment to understand that the GameCube's internal rendering resolution often does not match its external rendering resolution. A game might render internally at 512x448 but be resized for output to 640x448. For the typical 3-D accelerated GameCube game, the stretch is not going to lead to ugly visual artifacts. But 2-D games using pixels and tiles to show graphics will look very ugly, especially in High Fidelity Edition.
The official disc renders internally at 608x448 but displays externally at 666x448. This does lead to pixels which are smeared and crudely interpolated on the horizontal access. Swiss has many options, and while going into all of them is the subject of another blog article, one option is worth mentioning. Swiss has an Force Horizontal Scaling option which appears when you select a disc image file with the A button, then press the X button to enter the configuration menu for Swiss globally or for the game. In the Game Specific Settings, you should Force Horizontal Scaling to 1:1, then Save and Exit. Then you can start the disc image's software.
The official disc supports 480i or 480p if you have Component/D-Terminal or an HDMI adapter, otherwise its 480i only. It does not support 240p or any HD mode, interlaced or otherwise, over any kind of video cable. If you have set the Force Horizontal Scaling to 1:1 and used the Progressive Mode, then all that ugly interpolation will go away and you will have sharper pixels as a result. It still will not cut down on the lag of the official disc, but it is an improvement.
Working with .cli and .dcp Files
You may find, as you learn and experiment with GBI, that there is a particular Option for a particular Edition you wish to access which does not appear on the menu or you which to apply a particular set of defaults so you never have to fiddle with the Option Menu. GBI has the ability to modify the Option menu that Swiss shows by editing the .dcp file which accompanies the .dol file with a text editor. When you open a .dcp file, you will see a number of Names followed by a table of Values. You can find the Names and Values for each Option each Edition supports here via the links to each Edition's page.
Here is an example of a completed Name/Value Option in a .dcp file :
Name={--aspect, Aspect Ratio}
Values={3:2, 3:2}, {4:3, 4:3}, {5:4, 5:4}, {16:9, 16:9}, {16:10, 16:10}
When you select the Edition you wish to use, Swiss will present you with a screen full of options. There is a checkbox to each item and the default option is shown in gray when you first see this option screen. By pressing A on your controller, you can select and option and press left or right on your analog stick or D-pad to cycle through the options. To select an option, leave the option you wish to use on the screen and make sure the checkbox is checked and the text for that option is in white. Then press start on your controller and GBI will execute.
Important GBI Options Common to All Editions
 |
| Swiss GBI Standard Options 1 (Note that GBP Enhancement has been renamed from Rumble) |
Video Mode - The default video mode is 480i because it is most compatible across all displays. If you are playing on a normal, 15KHz horizontal scan frequency CRT, you will want to select 240p60. GBA games use a native resolution of 240x160, so you will have to deal with borders if you run a GBA game on a GameCube. However, GBA games are intended to run at approximately 60fps in a 240p-style progressive scan mode. 480i will not give you the best picture quality or the best experience.
If you are playing on a CRT VGA computer monitor, the monitor will expect a refresh rate of 31KHz or higher. 240p will usually fail on such monitors, so 480p is a good choice here. You will need the Nintendo Component or D-Terminal Cable or an HDMI GameCube adapter with an appropriate converter to the VGA standard for this to work. Composite, S-Video and RGB cables do not support the progressive scan rates required to display on a CRT VGA computer monitor. 240p120 may also work with these monitors because the refresh rate is double the 15KHz rate of 240p60.
 |
| Swiss GBI Standard Options 2 |
Rumble - This option's name is not quite fully representative of what this option does. When enabled, GBI will identify itself to GBA software as a GBP. Some GBA games will support Rumble or alternate colors when played on a GBP. If turned off, GBI will identify itself as a GBA, When GBA Video cartridges detect a GBP, they will not play due to licensing issues, but by turning this option off, they will play on the GBP.
Polling Rate - Because there is an interface between the GBA on the GBP and the controller, there will be added processing time to translate that controller data into what the GBA expects. The Polling Rate tries to cut down on the added lag by sampling the controller at frequent intervals. Keep this at the default unless your controller is not acting properly. The official GameCube wired, Wavebird Wireless and Hori Digital Pad (awesome but pricey) have no issue with the default option. I have heard good things about the most recent revisions to the Raph.net adapters that let you plug in a SNES controller into a GameCube. The Game Boy Advance to GameCube cable will let you use your GBA as the GBI controller and it too has no issues with the default polling rate. The VSync option is the most compatible but the slowest, it only samples a controller once per frame. It is required if you connect an N64 controller to a GameCube using a simple pin adapter.
 |
| Swiss GBI Standard Options 3 |
 |
| SMPTE Color Bars - GBA Matrix |
 |
| SMPTE Color Bars - Identity Matrix |
Special Features of GBI Standard Edition
 |
| GBI Standard In-Game Interface |
Standard can now essentially replace all the functionality of the official disc. Standard has in-game on-screen controls which can be accessed by pressing the X-button. (Note that I am using these button assignments are the default assignments for the GameCube controller.) When you press the X-button white text giving information such as the display resolution, the X and Y offsets for the active screen and the zoom level are shown and input to the game is blocked until you exit by pressing A or B. L and R will zoom in and out the screen in discrete increments and the Y-button will set the zoom back to default (typically 2x on 480i/p modes). The Z-button will take .png screenshots which are stored on the SD card. You can also shift the active GBA image using the D-pad in this mode. Standard is also the only Edition which can return to Swiss without rebooting the system. Hold down the Start button for one second while the screen controls are on-screen.
 |
| GBI Standard and High-Fidelity Dumping Program |
The final features which Standard supports are the borders from the official disc and the "filter" modes which the official disc can apply to the image. On the Options Menu in Swiss for Standard, you will see a Border option. The numbers displayed correspond to the border numbers from the official disc. Unfortunately, due to a hard limitation in the way the Options Menu handles the number of choices permitted to be selected, only eight borders can be selected via this Menu. Additionally, unlike the official disc, to select a new border, you must exit out of Standard, set a new Border and then boot Standard. Fortunately Standard will allow you to resume your game where you left off.
Standard also has a Filter option with three choices, Normal, Sharp and Soft. Like with the corresponding choices on the official disc, these options will cause little visual difference in most instances. When the Soft filter comes into play are for games that relied on the original handheld LCD's image persistence to create transparency effects. I discussed the effect in my blog article here. Where the original LCDs could rely on the slowness of the panel to respond to new images, Standard and the official disc have to actively blend frames together, which increases latency to about two frames. Like with the Border option, you must exit out of Standard to change the Option in Swiss before returning to Standard.
Benefits and Drawbacks of the Speedrunning and High Fidelity Editions
Both the Speedrunning and High Fidelity Editions sacrifice much in the way of convenience to achieve their goals. You cannot go back to Swiss once you start either Edition to change options, you must reboot the GameCube. You can still change cartridges by holding the Reset button on the GameCube while removing one cartridge and inserting another cartridge with the Ejector lever on the side of the GBP. (The GBP is the only hardware from the Game Boy to the Game Boy Micro which supports hot-swapping cartridges). There are no on-screen controls, everything must be done by the Options or the command line files (I'll explain those below). As a result of this cutting down, there is almost no extra latency in these Edition's default settings added from using a wired controller, whereas Standard and the official disc add at least one frame of lag by their image processing (two frames for the official disc). The original GBA has a refresh rate of 59.7225Hz and these Editions can almost match it at 59.7226Hz, so there will be no visual stuttering perceptible by normal people.
One curious feature that Speedrunning and High Fidelity have that Standard does not is the ability to apply Super Game Boy palettes to Game Boy games. (As a reminder, GBP does work with GB and GBC games). The Super Game Boy allowed the user to apply a four color palette with each palette entry freely selectable from the 15-bit RGB the SNES could display. GBI Speedrunning and High Fidelity also allow this.
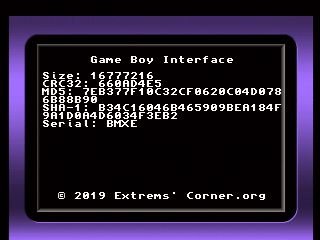 |
| GBI Speedrunning Checksum Utility |
High Fidelity has one rather useful feature which is lacking in the other Editions. The Color Space option allows you to select from YCC601, YCC709, YCC2020, RGB709 and RGB2020 if you are using the Nintendo Component or D-Terminal Video Cables. Normally Component Video uses the Rec. 601 color space, but this is not something set hard in stone, at least on the GameCube. If you wish to use a more modern color space like Rec.709 or Rec. 2020, you can. You can also have the GameCube output an RGB color space, which a Datapath capture card may appreciate more than YCC. It should be noted that the GameCube (and Wii) output graphics from the GPU as a form of Component Video (YUV 4:2:2 I think), not RGB. Conversions to RGB (as which happens with PAL GameCubes) can lose color fidelity because the conversion is not 1:1.
 |
| Metroid Zero Mission GBIHF GBA Matrix |
 |
| Metroid Zeron Mission GBIHF Identity Matrix |
In my opinion, the most simple way to capture high quality video with GBI and a Datapath VisionRGB E1/E1s is to use the High Fidelity Edition and set the Video Mode option to 240p60 and the Color Space to RGB709. Set the Input Resolution in vcs to 240x160, the Horizontal Size to 433, the Horizontal Position to 125, the Vertical Position to 58 and the Phase to 28. You may see purple borders outside the active GBA graphics area when you use this method, just position the window until they have been cropped out. Leave other options the same and resize to the size you want. You will need to use Vision to set the Color Domain to RGB (601) to get the colors to remain appropriate and stable. Leave Vision running and if the colors become bizarre, make the Vision window active to revert vcs' Color Domain choice. (vcs does not yet allow you to select Color Domain, and a resolution change can result in vcs defaulting to the incorrect Color Domain.) I would highly advise that if you are capturing footage via OBS to capture the VCS window, the Datapath and OBS may not work properly if OBS tries to capture the Datapath directly.
 |
| 240p Test Suite Diagonal Grid |
By now, despite a few quirks, you should consider the official disc as superseded by GBI for ordinary use. If you still have some attachment to the official disc, then Swiss can help you improve its visual clarity. First, you can use Swiss to boot any software in the standard .iso format. GameCube disc .iso images have a standard size, 1,459,978,240 bytes or 1.35GB. While the Action Replay is limited to FAT16 volumes, Swiss can read FAT32 volumes just fine. You can boot into Swiss with your 2GB card, then swap out the card for a larger card with disc .isos on it and use Swiss to read the larger card and boot disc images off it. Swiss can boot the official disc without an issue.
 |
| Official Disc Default Display |
 |
| Swiss Option Screen |
The official disc renders internally at 608x448 but displays externally at 666x448. This does lead to pixels which are smeared and crudely interpolated on the horizontal access. Swiss has many options, and while going into all of them is the subject of another blog article, one option is worth mentioning. Swiss has an Force Horizontal Scaling option which appears when you select a disc image file with the A button, then press the X button to enter the configuration menu for Swiss globally or for the game. In the Game Specific Settings, you should Force Horizontal Scaling to 1:1, then Save and Exit. Then you can start the disc image's software.
 |
| Official Disc Forced 1:1 Horizontal Scale |
Working with .cli and .dcp Files
You may find, as you learn and experiment with GBI, that there is a particular Option for a particular Edition you wish to access which does not appear on the menu or you which to apply a particular set of defaults so you never have to fiddle with the Option Menu. GBI has the ability to modify the Option menu that Swiss shows by editing the .dcp file which accompanies the .dol file with a text editor. When you open a .dcp file, you will see a number of Names followed by a table of Values. You can find the Names and Values for each Option each Edition supports here via the links to each Edition's page.
Here is an example of a completed Name/Value Option in a .dcp file :
Name={--aspect, Aspect Ratio}
Values={3:2, 3:2}, {4:3, 4:3}, {5:4, 5:4}, {16:9, 16:9}, {16:10, 16:10}
The Name line gives the unadorned option name, followed by the label Swiss will show in the Options menu. The Values line similarly gives the bare value followed by the label and continues for up to eight Value entries. In order to add or change a line in the Options, you must adapt this format to what you want to add or change. You can also remove options by removing a Name/Values pair of lines. The default value is given first on the Values line.
The .dcp format is limited to sixteen (16) Name options and eight (8) Values for each option. Each Edition of GBI has more than 16 options available for it, so if the default options are not what you need Swiss to show, you may have to pick the 16 best options or the 8 best values (as with the GBP borders).
The .dcp format is limited to sixteen (16) Name options and eight (8) Values for each option. Each Edition of GBI has more than 16 options available for it, so if the default options are not what you need Swiss to show, you may have to pick the 16 best options or the 8 best values (as with the GBP borders).
Next, if you have a fresh installation you will see in the root directory of your SD card a gbi.cli.example file and a gbisr.cli.example file. These files, as their second extension suggest, are examples which you can modify. If you eliminate the .example at the end of the file names, then these files become active for that Edition of GBI for which they are named. .cli files will enforce the option choices entered in the file whenever that Edition of GBI is booted.
A .cli file is a text file which will have several lines which look like this :
--aspect=4:3
--overlay=frame-srgb.tpl.gz
--dither=none
--matrix=identity
The format, as you might guess, is --[option name]=[option value]. You obtain the basic option name from the website linked above and then set a valid value. Then the next time you start that Edition of GBI, the options in the .cli will be used regardless of what may show up in the Swiss Options menu.
Further Resources
In addition to the main wiki page for GBI, Extrems also maintains separate wiki pages for each Edition, Standard, Speedrunning and High Fidelity. On each page each option for each edition is defined, screenshots are posted from a variety of devices and recommended settings are given for capture devices and scalers like the OSSC (highly recommended if using a large flat-screen TV) and the Framemeister. While the wiki is an invaluable resource, sometimes it can be a little cryptic, so you should ask questions on the GC-Forever Forums or on Extrems' Corner discord server.
Amazing stuff as usual! Now to go buy a GBP from eBay... :-)
ReplyDeleteexcuse me does anyone know which button is selec on the game cube controller in the game boy player?
ReplyDeleteX/Y or L/R are assigned to the GBA's Select button.
DeleteI've been having issues trying to dump my copy of FFV on the GBA using Game Boy Interface. For some reason, it just freezes after I press "Dump ROM" and there is no progress text. I've left it even alone for one hour and nothing happens. I can dump the BIOS though but idk why. Would anyone know what I could do?
ReplyDeleteThis comment has been removed by the author.
ReplyDelete