Wednesday, June 30, 2010

Vintage Gamer's Guide to Sound Blasters (ISA)

Sound Blaster 1.0/1.5


These are the original models of the Sound Blaster.  The chief difference between the two is that the 1.0 version has two CMS-301 chips soldered onto the board while the 1.5 version has empty sockets for those chips.  The CMS-301 chips are Creative's name (put on stickers) for Phillips SAA-1099 chips.  These chips are the only source for stereo output on these cards, and if you can find two of these chips, you can turn a 1.5 into a 1.0.  Adding the chips provides for a very good degree of compatibility with Creative Music Systems Card and Game Blaster software.  This compatibility is not perfect because some programs and games (Taito) require the presence of a special chip found only on those cards. 

These cards contain a single Yamaha OPL2 (YM3812 + YM3014) chipset.  This chipset is the exact same chipset the Adlib Music Systems Card uses and is also located at the same I/O range (388/389h), which provides for perfect compatibility with any software supporting Adlib.  These chips may be socketed or soldered.

The gameport on these cards can be disabled via removing JP1.  It is IBM PC compatible and uses I/O address 201.

I/O addresses ranges include 210-21F; 220-22F; 230-23F; 240-24F; 250-25F; 260-26F.

Available IRQs are 2, 3, 4, 5, 7.  The only DMA channel this card can use is 1 and it cannot be fully disabled, despite the DMACTRL jumper.

These cards have no on-board mixer, volume control is done by the application and the volume wheel at the back of the card.  The output is amplified for headphones and unpowered speakers.

These cards support line out and mic in, there is no separate line in.  The mic in jack is often rusty with these old cards.

The large socketed chip is the Digital Signal Processor (DSP).  In earlier cards, DSP V1.05 is usually present.  DSP V1.03 is also confirmed to exist.  These DSPs will have a sticker label on them.  Some later cards use a DSP V2.0.  This DSP has an etched silkscreen on the chip.  The DSP handles digitized audio and midi I/O.  As the chip is socketed, it could be upgraded from a V1.xx to a V2.00.  Doing so would allow the card to achieve compliance with MPC-1 standards. 

DSP V1.xx supports single-cycle DMA mode, ADPCM modes from 8-4 bits, 8-3 bits and 8-2 bits.  It supports 8-bit mono output up to 23,000 kHz or 11,000-13,000 kHz using ADPCM.  It supports normal mode midi output.  DSP V2.00 adds auto-initialize DMA mode and UART midi mode.  The Sound Blaster is totally incompatible with the Roland MPU-401 midi interface, which is what early games that supported midi (generally the MT-32), used. 

The gameport also supports midi input/output and can use gameport-to-midi cables. 

This card uses T1 (Type 1) in the SET BLASTER line in your autoexec.bat.  The default SET BLASTER variable is as follows:

SET BLASTER=A220 I7 D1 T1

Sound Blaster Pro 1.0


These cards contain a dual Yamaha OPL2 (2 x YM3812 + 2 x YM3014) chipset.  The chips may be socketed or soldered.  This allows for stereo music output.  Game Blaster compatibility was removed to achieve this.

This card supports a Panasonic CD-ROM interface.  This interface is incompatible with standard IDE/ATAPI CD-ROM drives and requires special drives.  The interface does not use any additional resources beyond the normal I/O address range this card uses.

I/O addresses ranges available are 220-233; 240-253.

Available IRQs are 2, 5, 7, 10.  Available DMAs are 0, 1, 3.  Using DMA 0 is not a good idea because games assumed DMA0 would be used for refreshing system RAM.  However, AT class systems use dedicated refresh circuitry.  Using IRQ 10 is also not a good idea, many games will not recognize IRQs higher than 7. 

These cards support line out, line in and mic in.

This card uses DSP V3.01 and the CT-1345 mixer.  DSP 3.xx adds support for stereo digital output up to 8-bit/22,050 kHz and mono digital output to 8-bit/44,100 kHz.  It adds the high speed stereo and mono DMA modes.  The CT-1345 supports output mixing in 8 volume steps in stereo for Voice, MIDI, CD and 4 volume steps in mono for the microphone.  It has 8 volume steps for the Master Volume.  It can also mix PC Speaker output in mono.  It has a special register switch for digital stereo modes and a 3.2k output low-pass filter.

The volume control wheel is still present.

Has onboard CD-ROM input connector (white plug) and PC Speaker connector (2-pin).

Note that while this card has a 16-bit ISA slot connector, it is an 8-bit card.  The 16-bit portion of the connector only allows the card to use IRQ 10 and DMA 0.  It fits and works just fine in an XT machine.

This card uses T2 (Type 2) in the SET BLASTER line in your autoexec.bat. The default SET BLASTER variable is as follows:

SET BLASTER=A220 I7 D1 T2

Sound Blaster 2.0


See Sound Blaster 1.0/1.5, above for basic capabilities.  Changes include:

Card uses DSP v2.01 or 2.02.  It adds support for mono digital output to 8-bit/44,100 kHz.  It adds the high speed mono DMA mode.

Card has two sockets for CMS-301 chips and a third socket for a specially programmed PAL16L8 chip which is required to interface with the CMS-301 chips.  Without the PAL chip, which was included in the upgrade kit, the card cannot utilize the CMS-301 chips or provide any Game Blaster compatibility.  The PAL has been decoded and GAL chips can be programmed to work in the socket.  Boards have been shown to work with GALs manufactured by National Semiconductor and Lattice, but not with SGS Thompson GALs.  Boards with a CT1336A chip do not work with the upgrade, even the official upgrade from Creative Labs.

Card has line out, line in and mic out and a volume wheel.

I/O addresses ranges include 220-22F; 240-24F.

This card uses T3 (Type 3) in the SET BLASTER line in your autoexec.bat.  The default SET BLASTER variable is as follows:

SET BLASTER=A220 I7 D1 T3

Sound Blaster Pro 2.0


Identical to the Sound Blaster Pro 1.0, except for:
 
These cards contain a Yamaha OPL3 (YMF262 + YM512) chipset. The chips are always surface mounted.  Stereo music output is not programmed in exactly the same way on the OPL3 as on the dual OPL2 of the Pro 1.0.  Most games that support stereo OPL music support both types of Sound Blaster Pro.  DragonSphere and Ultima Underworld are exceptions, the latter only supports the dual OPL2 of the Pro 1.0 and the former supports dual OPL2 much better than OPL3.  DSP V3.02 has been seen on these cards, but V3.01 may be more common.

This card uses T4 (Type 4) in the SET BLASTER line in your autoexec.bat. The default SET BLASTER variable is as follows:

SET BLASTER=A220 I7 D1 T4

These are the first cards that have OEM versions that support a CD-ROM interface other than the standard Panasonic.  The retail version, the CT-1600, has a Panasonic interface.

Sound Blaster MCV/Sound Blaster Pro MCV

CT-5320 & CT-5330


These are the Micro Channel versions of the Sound Blaster and Sound Blaster Pro, respectively for the IBM Personal System/2 computer series.  They are full-length 16-bit Micro Channel cards.
 
The Sound Blaster MCV has identical features to the Sound Blaster 1.0/1.5 except they have no CMS-301 chips or sockets for them, no volume knob and cannot select IRQ2. I/O is selected in software. 
 
The Sound Blaster Pro MCV has identical features to the Sound Blaster Pro 2.0 except it has no CD-ROM interface, no volume knob and cannot select IRQ2.  I/O, IRQ and DMA are all selected in software.

These cards may not work properly in high speed Micro Channel systems.  Like all Micro Channel cards they require .ADF files to configure the cards (partially) when inserted into a Micro Channel system.  Compatibility wise they may be a bit more finicky than ISA sound blasters. 
 
The Sound Blaster MCV should use T1 in the SET BLASTER line in your autoexec.bat. The default SET BLASTER variable is as follows:

SET BLASTER=A220 I7 D1 T1
 
The Sound Blaster Pro MCV should use T5 in the SET BLASTER line in your autoexec.bat. The default SET BLASTER variable is as follows:

SET BLASTER=A220 I7 D1 T5
Sound Blaster 16


Early cards contain a Yamaha OPL3 (YMF262 + YM512) chipset.  Later cards may have true OPL3 functionality included in the CT-1747 chip.  Even later cards may use the CT-1978 CQM chip, which approximates OPL FM Synthesis (or improves upon it according to Creative.)  CQM in my opinion has a harsher sound than Yamaha FM Synthesis.

Card has line out, line in and mic out.

Has onboard CD-ROM input connector (white plug and/or black plug) and PC Speaker connector (2-pin).  Later cards may have AUX or MODEM or TAD connectors. 

Many boards have a 26-pin header for a Waveblaster-compatible midi daughtercard. 

Early cards still have a volume wheel; these cards also have jumpers that allows the user to disable the on-board amplifiers, making the wheel useless. 

Boards frequently support the Panasonic, Sony and/or Mitsumi CD-ROM interfaces or an IDE/ATAPI interface.  The Panasonic interface does not take up extra resources, but the Sony, Mitsumi and IDE interfaces require an IRQ and I/O for the IDE.  They may or may not be able to be disabled. 

Many of these cards have an empty socket for a CT-1748 Advanced Signal Processor (ASP) or Creative Signal Processor (CSP).  Some cards have the chip soldered onto the board.  This processor, which was supposed to provide surround sound and more, is not known to be used in games other than TFX.  There are jumpers to enable or disable the chip if the chip is in a socket. 

This card uses DSP (maybe V4.01) V4.04, V4.05, V4.11, V4.12 and V4.13 and the CT-1745 mixer. DSP 4.xx adds support for mono or stereo digital output up to 8-bit/44,100 kHz or 16-bit/44,100 kHz . It scraps the high speed modes of the Pros but allows the other pre-existing single-cycle and auto-init DMA modes to support digitized sound up to 44,100 kHz in 8-bit or 16-bit.  If a game uses single-cycle DMA modes, the listener will experience pops and cracks that would not be present in earlier cards.  DSPs 4.05 and lower are very noisy when it comes to digital audio output.

A UART mode compatible MPU-401 midi interface is added at I/O 330 or 300.  This interface may also be disabled on some cards via jumper.  It will not work with games requiring a 100% compatible Roland MPU-401 interface (namely games requiring normal/intelligent midi mode support).  Such games are typically Roland MT-32/LAPC-I games; General MIDI games will almost invariably work with a UART compatible MPU-401 midi interface.  The UART MPU-401 interface will communicate through the gameport or the wavetable header.  DSPs 4.11-4.13 are subject to the hanging or incorrect notes midi bug, with some cards more affected than others.  The bug tends to rear its head when the DSP is also trying to process digitized sound at the same time as midi. 

I/O addresses ranges include 220-233; 240-253; 260-273; 280-293.  Available IRQs are 2, 5, 7, 10. Available low/8-bit DMAs are 0, 1, 3. Available high/16-bit DMAs are 5, 6, 7. 

In the early cards, there are jumpers to select I/O addresses, IRQs, DMAs, Midi I/O.  Later cards allow software IRQ and DMA selection through the Creative Configuration Manager.  This program must be loaded on bootup to assign resources to these cards.  Even later cards are Plug-n-Play compatible, eliminating jumpers for I/O and many other settings. 

The CT-1745 mixer supports output mixing in 32 volume steps in stereo for Voice, MIDI, CD, Line-In, 32 volume steps in mono Microphone and 4 volume steps in mono for the PC Speaker.  It has a 32 volume step Master control.  It allows 4 levels of Gain control and 16 levels of Treble and Bass control.  It does not have the stereo switch of the CT-1345 and uses dynamic filtering instead of a set low-pass filter.  Certain cards may not include the CT-1745 mixer chip, their mixers tend to lose the Treble and Bass control and sometimes the Gain control.  These cards use chips marked ViBRA.  It is unknown whether any games use the Treble and Bass controls. 

The last cards in the series were the Sound Blaster 16 WavEffect cards.  CT-4170 is an example of such a card.  These use 2 low DMAs instead of 1 low DMA and 1 high DMA for 16-bit sound.  This may be incompatible with games that expect to use a high DMA for 16-bit digitized sound.  Few use the H-DMA channel. 

This card and its ISA successors all use T6 (Type 6) in the SET BLASTER line in your autoexec.bat.  The default SET BLASTER variable is as follows:

SET BLASTER=A220 I5 D1 H5 P330 T6

H refers to the high DMA channel, P refers to the MPU-401 midi I/O used.  By this time, the default IRQ has changed to 5, probably to avoid conflicts with the printer IRQ.

Sound Blaster AWE32/32


See Sound Blaster 16, above for basic capabilities. Changes include:

The biggest change is the inclusion of the E-mu (EMU8000 and EMU8011) midi processor chipset.  Except as noted below, this chipset can use 1MB of ROM plus up to 28MB or RAM to store sampled instruments contained in files called SoundFonts.  Two 30-pin SIMM slots are provided, but they use plastic retention clips that are very cheap and easy to break.  (Epoxy is your friend if they do.)  Up to 16MB SIMMs can be used, although 28MB is the maximum that the E-mu chipset can address.  While some DOS games supported these cards, they typically only used the ROM samples. 

Sound Blaster 32 and Sound Blaster AWE32 Value cards generally do not have a wavetable header.  Value cards also do not have SIMM slots for RAM upgrades.  Sound Blaster 32s do not have RAM onboard and use ViBRA chips but do have SIMM slots.  AWE32s usually have the ASP/CSP chip of the 16s soldered in. 

The AWE32 and AWE32 Value come with 512K of RAM for Soundfonts.  When RAM is inserted into the slots, the on-board RAM is disabled.  There is a "Goldfinch" card that can be used to upgrade a Sound Blaster 16 with the EMU capabilities.  Most Goldfinch cards do not have an audio-out mini-jack, seeing as they were an OEM product, so a special cable will be needed to output sound. 

Many of these cards have a 2-pin header for an S/PDIF connector.  This S/PDIF can only pass EMU and OPL sound output. 

Typical cards have a line in, mic in, line out and speaker out jacks.  Earlier cards come with Panasonic, Sony and Mitsumi CD-ROM interfaces, later cards use IDE.  If the IDE interface on these cards cannot be disabled or changed to an unused portion of the I/O space, then you may have a resource conflict with your motherboard. 

The default SET BLASTER variable is as follows:

SET BLASTER=A220 I5 D1 H5 P330 T6 E620

The E variable refers to the starting I/O address of the EMU8000.  Its address depends on the addresses at 220-280.  If the main I/O starts at 220, then 620-623, A20-A23, E20-E23 are used.  If I/O starts at 240, then 640, A40, E40 are used.  I/O address 100 is used for the Creative 3D Stereo Enhancement effect of dubious value.  

In the AWE32 series, the cards choose IRQ and DMA in software, writing the settings to a small EEPROM.  The user still needs to set the I/O addresses manually for some of the earlier cards.  Later cards only tend to allow you to disable the MPU-401 interface and enable the SIMMs by jumper.  Even later 32s support ISA PnP for configuration, but those are virtually indistinguishable from the AWE64s.

There is no difficulty with trying to access a midi device connected to the wavetable header or gameport.  If you are trying to access the EMU as a midi device, and the program does not specifically support the AWE32, then you will have to load a TSR utility called AWEUTIL in order for the EMU to emulate a full midi device.  AWEUTIL takes up alot of conventional memory and is incompatible with programs that use DOS extenders (DOS4GW, CWSDPMI, DOS32A) such as DOOM and most DOS games released in 1994-present.  It also requires a system with a working Non-Maskable Interrupt (NMI). 

Since AWE32s use DSPs 4.11-4.13, they will suffer from the DSP hanging note bug described above when using ordinary midi devices.  The ones without a CT-1747 chip will use the CQM method of FM emulation (see Sound Blaster 16, above).  This includes most of the AWE32 PnPs and SB32s.  There is also the occasional card with YMF-262 or YMF-289 ICs, which are genuine Yamaha FM OPL3 chips.  For these cards, you cannot get S/PDIF FM audio output.

Sound Blaster AWE64


To DOS, this card is identical to the AWE32.  In Windows, it can provide 32 more software voices of polyphony in midi by use of the Wayesynth software.  This uses sythesized sounds, not digitized sounds from a soundfont file, and was little supported. 

Sound Blaster AWE64 Gold cards have S/PDIF connectors which add digitized sound support as well as OPL and EMU.  They come with 4MB of Soundfont RAM, whereas the standard card comes with 1MB and the value card 512KB.  The Gold cards come with gold-plated RCA jacks, the other cards must make do with mini-jacks. 

All AWE64s use CQM, but as they use DSP 4.16, they no longer suffer from the DSP hanging note bug.  All use CQM for FM synthesis emulation.

To upgrade the RAM to the 28MB maximum, one has to find proprietary Creative memory modules or use an adapter like AWE-SIMM or SIMMCONN with 30-pin SIMMs.

Thanks to wikipedia for providing fair use images.

Saturday, April 17, 2010

IBM Model M Tips and Resources

Today I will be posting for a third time on one of my favorite subjects, the IBM Model M Keyboard.  First, I will talk about tips, then give some links with a description about what can be found on them.

How to open/unscrew a Model M?

The shell of the Model M is held together by four hex nut screws.  Three are recessed.  You need a nut driver to open it.  The proper size is 7/32" and it should have a slim barrel.  You can find the correct driver in a Sears.
The proper name of the product is Craftsman 7/32 in. Easy-To-Read Socket, 6 pt. Deep, 1/4 in. drive, model #45815.

This is what it looks like:

Look here for the Sears product page:
http://www.sears.com/shc/s/p_10153_12605_00945815000P?keyword=craftsman+7%2F32

You will also need a 1/4 in. spinner to attach it to.  Craftsman 6 in. Spinner Handle, 1/4 in. Drive is what you need.  Sears carries it too here: http://www.sears.com/shc/s/p_10153_12605_00943393000P

Whenever I have a need to open a Model M, usually because of something I spilt, I could never seem to find my driver.  This meant an quick trip to Sears to buy another.  If you don't have an urgent need to open your keyboard and would like a one piece solution, see here:
http://www.clickykeyboards.com/index.cfm/fa/items.main/parentcat/11298/subcatid/0/id/105901

The Model M will not work with my PS/2 port

If your Model M does not work reliably or at all, your PS/2 port may be to blame.  The Model M is a device from the mid-to-late 80s, and the keyboard control board and LEDs inside the machine draw a lot more current than a throw-away, el-cheapo modern keyboard use.  It requires 275mA, whereas a modern cheapo keyboard may only need 1/10 of that.  Some PS/2 ports just cannot provide the current for a Model M to run reliably or at all.  I have never encountered this particular problem myself, but according to the link below, it can be found in many motherboards. 

There are two solutions to this problem, both are listed on this page:

Saturday, March 27, 2010

Ninja Turtles Mania

You would be hard pressed to find a boy who grew up in the 1980's who was not a fan of the green quartet known as the Teenage Mutant Ninja Turtles.   Our interests at Nerdly Pleasures are very broad, and we certainly remain very fond of them today.  In this article, we will reflect on the major incarnations of the Turtles to-date.


My introduction to the Turtles was typical. I first saw them in the original cartoon series which was first broadcast at the end of 1987 and lasted until 1996. This series was so tremendously popular that it became cemented in pop-culture heritage.  As they did not aspire to the high artistic merits of series like Looney Tunes/Merrie Melodies, Silly Symphonies or even Tom & Jerry, they tend not to earn serious attention from animation critics.

In 1988 only the first mini-series had been broadcast, so it was the earliest stages of TMNT mania.
 Playmates toys just landed on the store shelves, video games were in the works, and the live-action films were not yet on the horizon.  

The cartoon series lived up to its intent to be goofy fun.  The good guys were fun and funny, the bad guys inept but never truly vicious, and there was plenty of ninja action to go around.  Real effort was put into making the turtles unique from each other beyond the color of their bandanas:  Leonardo the leader, Donatello the nerd, Raphael the wise-cracker and Michaelangelo the wild and crazy dude.  There was even a small extent of character development over the series.


Not too long after I started watching the cartoon regularly, I was introduced to the Turtles' original media, the comic books.  I was never really a comic book junkie, but I quickly became a fan of the Mirage Comics series.

These Turtles were a revelation to me having watched their juvenile versions on TV.  They lived in a rather gritty world, they fought and argued with each other and actually killed their enemies!

The cartoon always had problems with Leonardo's Katanas and to a lesser extent Raphael's sais, as the sharp and pointy implements would cut and piece flesh instead of merely brusing it. Censors overseas had more problems with Michaelangelo's nunchucks, frequently editing them out of the broadcasts. Nunchucks are quite lethal in their own right, but Europe and Australia were in the midst of a moral panic over the concept of ninja in entertainment, believing children would copy the ninja moves they saw on TV.  However, katanas and sais remained in the program.  In contrast, in the comic book, Leo and Raph would not hesitate to use the business end of their weapons on any enemy.


As I mostly acquired the colorized graphic novels, I had difficulty appreciating that TMNT was a black and white comic.  When TMNT was first being published in the mid-1980s, the creators were essentially self-publishing the comic.   Self-publishing in those days was often something one did part-time, a status which would continue until if and when your book really began to sell.  Printing in color was simply beyond the resources of the TMNT creators, Eastman and Laird.  Even the comic book's cover did not gain full-color until #5 (after 1-4 and Raphael 1).  Like Cerebus, what began as a necessity continued as an artistic choice.

I really enjoyed Volume 1 of TMNT through issue 21, which concluded the Return to New York storyline.  After that, even I could tell that its creators were no longer seemingly involved in the stories and the style varied so wildly from issue to issue that I quickly became turned off.  I never did manage to read Volumes 2 or 4, and what little I read of Volume 3 did not encourage me to want to read more.  Officially it is treated as a red-headed stepchild.

Having acquired a love for all things Turtles, naturally my attention was drawn to the reports that there would be a TMNT game for the NES.  The NES was a constant companion in those days, and I eagerly awaited the release of the game with great anticipation.  I remember calling every toy shop and electronics place around to see whether they had the game in stock on opening day.  None did.  A week later my mom and I confirmed the existence of the game at a distant store and we traveled in the early morning to get there to get my copy before they ran out.


The game itself had been widely commented and criticized, but I will give you my impressions.  First, although based off the cartoon, the TMNT theme did not seem to be well-integrated into the gameplay.   No Krang, Baxter, theme music, mousers and foot soldiers that barely looked the part and somewhat of a grim atmosphere.  Second, the game was cruelly unforgiving.  Limited continues, poor hit detection, large hit area for your characters, nearly constantly respawning enemies, tricky jumps, lots of pits, limited health items.  Michaelangelo and Raphael were nearly useless due to their short attack ranges.  Donatello's bo was the most powerful weapon, so he had to be saved for bosses at all costs.  The graphics, although flickery, and non-traditional sound were very well done, a testament to the skills of Konami (published under its Ultra Games label).  However, the game really felt like it originally was not intended to be a TMNT game but the imagery was later tacked on.  On the other hand, back in 1989 when the game was first released, TMNT was still pretty new and the TV show concepts still somewhat under-defined.

Still, the game sold millions and Konami made up for it in its other TMNT games.  The Arcade Game was awesome.  One of the best beat-em-ups ever, it allowed for four player simultaneous action, which may not have ever been done in the beat-em-up before.  It had very colorful graphics, upbeat and catchy tunes and followed the cartoon to a T.   It sucked many a quarter or two out of me back in the day.  Its NES port may not have been anywhere as graphically impressive, but it was a superb port.  Konami tightened the control scheme in the NES port and even added additional levels not found in the Arcade version.  Konami followed it up on the NES with The Manhattan Project and the Arcade with Turtles in Time.  Ports of the latter game to the SNES and (more loosely) to the Genesis were also top notch.  Most ports of hot media properties to video games tend to be (especially back then) to be crap.  Not so with the Turtles, thanks to the talented designers at Konami.


Following our rough chronology, I soon learned that the Turtles were coming to the big screen.  The first TMNT movie is pure corn, and the sequels even more juvenile.  The movies did not seem to take themselves any more seriously than the cartoon.  But this was live-action, and the silliness that the cartoon could get away with looked foolish at the multiplex.  The guys in green looked exactly like what they were, actors and stuntmen in costume.  The costumes were pretty good looking, and the face masks did a nice job of lip-syncing, but the facial expressions were rather limited.  At least the Shredder had an air of menace until he stupidly tried to run Splinter through with his spear.  And I know Splinter has always been depicted as old, but in this movie he seems positively arthritic and you could almost see his wires or motors being manipulated.  The Turtles were born in comics and found a home in cartoons, but just cannot fit within the confines of live action film.  I have yet to see the computer-animated film, but it is in my Netflix queue.

Like many childhood interests, my interest in TMNT faded as I grew older.  Lately, feeling the need to recapture some of my youth, I have reawakened my interest in the franchise.  I had known that there was a new cartoon series, closer to the darker, more mature (non-Archie) comics.  But being on the 4kids channel and often on Saturday mornings, I never got around to watching them.  However, when they did a countdown of the 10 greatest episodes recently, I used my DVR to examine this series.


Upon watching several episodes, I was struck how closely the series hewed to some of the old Mirage storylines.  Being a more maturer version than the '87, series, it is incredibly violent for a kids' show.  The Shredder is a vicious creature indeed.  A fair comparison between the old cartoon Shredder and the new would be Cesar Romero to Heath Ledger's respective Jokers in Batman.  Characters die and even get maimed in the show.  The foot soldiers, while still not much more than the Turtles' practice dummies, are human beings, not robots as in the original show.

There are many positive things about the new show.  It takes itself seriously and treats the Turtles with respect.  Raphael is his true bad-tempered self, Leonardo practically embodies the concepts of honor and fidelity.  Donatello is more sensitive and Michelangelo (preferred spelling), is good-natured without constantly spouting dated one-liners or looking for a pizza.  Having read the comics, it is fun to watch how the episodes deviate from the printed stories.  There is a strong sense of continuity throughout the series with returning allies and villains.  Eventually, the series started to progress to season-long storylines, which people tend to love or hate.  (My view tends to be closer to hate, unless the whole series is on DVD or demand.)


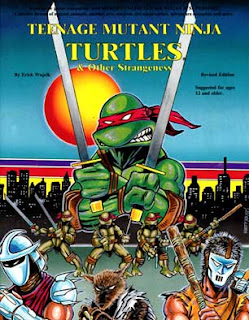
A digression before I conclude.  TMNT and Other Strangeness by Palladium Books was my first experience with a pencil and paper RPG.   This book was awesome, but it took me a while to really appreciate it. It had artwork from Eastman and Laird, even an original story or two.  It gave the stats for all the major characters that had appeared in the TMNT Mirage comic up to that point.  As the point was issue #4 (after Raphael #1).  It had pages of equipment, multiple adventure scenarios, and an excellent animal character creation system.  However, it was not the ideal game to bring a brand new player into RPGs.  Also, unless the RPG was AD&D, it was difficult to find other players.

This week I watched the TV movie TMNT Forever.  This is a movie-length episode of the new series where the current Turtles meet up with the Turtles from the old cartoon.   The modern Turtles and characters were the same as always, but the older cartoon characters seemed to suffer by comparion.  The modern characters always remark on how silly the behavior, ideas and technology of the old characters by comparison.  The movie shows that the old cartoon Turtles are seemingly unequipped to deal with the challenges faced by the modern Turtles.  Still, it was an entertaining hour-and-a-half and nice to see the old characters return to the screen after nearly fifteen years,  Shame they couldn't get the old voice talent.

To conclude this epic post, I would  point to the title.  I always used to hear non-fans refer to the franchise referred to as "Ninja Turtles".  No Teenage, Mutant and often not even a "the".  That pretty much summed it up for those who could not appreciate it.  Appreciation of the franchise requires a love of the ridiculous, which is appropriate for an idea that began as a parody of serious comic books like Daredevil and Ronin.  The franchise has been accused of being the epitome of banal commercialism.  Yet it appealed to a generation of young boys, for a while.  Not too long after it became popular, it seemed  you were a dork for admitting to liking the Turtles.  Each one of my elementary/middle school associates was quicker to distance himself than the last.

Sunday, March 21, 2010

Tutorial : How to Get the Roland MT-32 working with DOS Games

As a followup to my previous post about the Choices for Roland LA Synthesis, I have decided to write a tutorial on how-to make DOS games work with them. This tutorial assumes that the reader has or will have a real Roland MT -32 or one of the compatibles listed in my previous post on the subject. This tutorial is not intended for those using the MT-32 emulator called Munt or any other hardware device that claims MT-32 compatibility.

With that out of the way, there are two guaranteed methods get your MT-32 or compatible working with DOS games. Method 1 is by using a hardware Roland MPU-401 Midi interface. Method 2 is using DOSBox.

Method 1 : Hardware Midi Interface

(a.k.a. the Intended Way). Ah, if you are going the Method 1 route, you are truly adventurous and deserve respect for attempting it. You have your MT-32 or compatible unit, probably acquired off eBay or Yahoo Auctions Japan. Now you need a midi interface for the game to communicate with the module. (That is what those DINs on the back of these modules are for.) Since we are playing DOS games on an IBM PC or compatible, you are going to need a midi interface in the machine. (Atari ST users had midi interface ports with DIN ports built into the system, a design feature that never made it into the PC world.) Moreover, most of the DOS games of the MT-32 era, which runs from 1988-1992, assumed that the interface would be a Roland MPU-401 interface.

A bit of back-history here: Roland, makers of the MT-32, designed an interface box called the MPU-401 Midi Processing Unit so a computer could communicate with midi modules, whether its own or from a competitor such as Yamaha, Casio or Korg. The original MPU-401 could have been released in 1984 but would certainly have been available in 1985. The Unit is pretty large and looks like this:


It is a little hard to make out from the picture, but the Unit has two MIDI OUT ports. The rest of the ports are unimportant to a gamer. You have to connect a 5-pin DIN cable from the MIDI OUT of the Unit to the MIDI IN of your MIDI module or keyboard. On the other side, which is not visible, there is a DB-25 pin female connector.

The MPU-401 Midi Processing Unit was not tied to any specific computer. Roland made adapter cards and cartridges to allow the Unit to work with Apple IIs (MIF-APL), Commodore 64s (MIF-C64), IBM PCs (MIF-IPC & MIF-IPC-A) and most popular Japanese PCs. These MIF cards/cartridges only contained some simple glue logic to give the computer access to the data port and command/status port on the Unit. The adapter card/cartridge connect to the Unit via a mostly standard DB-25 male to male cable.  The only difference between a standard cable and an MIF-IPC or MIF-IPC-A card is that pins 13 & 25 (ground) are connected in the cable.

If you obtain an MPU-401 Unit, it is useless without an adapter card. As previously mentioned, Roland made two for IBM PCs and compatibles, the MIF-IPC and MIF-IPC-A. The MIF-IPC came first and is designed for bus of the IBM PC and IBM PC/XT (also works with the IBM PC Portable should work with most 8088 processor-based PC compatibles). It is an 8-bit ISA card, and does not reliably work properly with an IBM PC AT or faster computer (essentially anything with an 80286 processor or better) The MIF-IPC-A is the simplified version and is compatible with the IBM PC, IBM PC/XT & IBM PC AT. It is also an 8-bit card and is not bus-sensitive, so it should work in any ISA slot of any IBM-PC compatible, regardless of CPU speed. The MIF-IPC-A is an incredibly simple card, someone with the proper skills and a few parts could easily reproduce it on an ISA prototype board. The schematic is here:


Although the Unit was developed and sold long before Roland convinced Sierra On-Line to support its MT-32 in King's Quest IV and other high-profile 1988 games, Sierra used the MPU-401 to provide the interface between computer and module. Sierra sold the MT-32 to its customers so they could hear great music in its games, and also bundled a MPU-401 interface.

By this time, Roland had made an IBM PC-specific product called the MPU-IPC. This product contained an 8-bit ISA card, which contained the midi interface, and a smaller breakout box which contained the connectors for midi modules. A DB-25 pin cable connected the two. Often on ebay you may see either the card or the breakout box but not both. Both are required to communicate with an MT-32 or compatible. If you have the interface card, you can make a midi output port with a few electronic parts. Like its immediate predecessor, the MPU-IPC should work in any computer with an available ISA slot.

Before I continue with my description of MPU-401 interfaces, I must talk for a moment about setting up your game and card to work with the interface. The MPU 401 interface on an IBM PC or compatible requires certain system resources, two input/output ports and one IRQ. The previously mentioned cards are all wired to use I/O 330/331 and IRQ 2/9. This cannot be changed absent soldering and trace cutting on the cards. As this was the default, games expect that the interface will use these ports and IRQ. Later cards allow the user to change these resources, but I always say that you should keep to the default. All you need to do with your game is to set it to use the MT-32 whenever offered (chiefly for music but sometimes for sound effects) and it will work. You do not need to load any drivers (outside of the game) or type any strings in your AUTOEXEC.BAT file.

The next year, Roland introduced two new MPU-401 compatible products, the MPU-IPC-T and LAPC-I. The first was a cost reduced version of the MPU-IPC and and for our purposes, is identical to it with one exception. This was the first interface product whereby Roland allowed the user to change the settings for the system resources to be used via jumpers. If you obtain this card, you should make sure the jumpers are set to use the default system resources I/O 330/331 and IRQ 2/9. The proper settings are illustrated in the manual, which is available at Roland's US site, backstage.rolandus.com/login.php, after a free registration. Also, there is a schematic diagram in that manual that will allow you to make a MIDI OUT port for either the MPU-IPC or MPU-IPC-T if you don't have the breakout box.  Finally, the breakout box for the MPU-IPC will work with the MPU-IPC-T and vice versa. The MPU-IPC-T looks like this (the MPU-IPC looks almost exactly the same):


The second product, the LAPC-I, combines the MPU-401 MIDI Interface with the circuitry from a Roland CM-32L module all one one 8-bit ISA card. It is a perfect solution for MT-32 DOS games except for those (few) games that utilize bugs on the first generation MT-32 modules. It also allows you to change the settings, so please refer to the manual (available at Roland's US site) for the proper settings. All the caveats that I mentioned in my previous post on the subject of the Roland LA Synthesis devices apply here. This card is 13" long, so your case and motherboard cannot block it. It needs a -5v power source from the PSU, which may not be available on all computers. It also tends to go for very high prices on eBay. If you want to use an external module, such as a Roland SC-55 or MT-32 for the MIDI messages, you will need the MCB-1 breakout box.

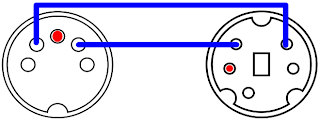
In 1991, Roland released the SCC-1 GS Sound Card. Similar to the LAPC-I, the card combines the MPU-401 MIDI Interface with the circuitry from a Roland CM-300 module all on one 8-bit ISA card. This card should be compatible with all IBM PCs, and is much smaller than the LAPC-I. To connect to external midi modules, it uses mini-DINs on the card bracket. You will need a mini-DIN to DIN adapter to connect to an MT-32 or compatible. Two were included with the card, but if your eBay purchase did not come with them, you will need to find a substitute. No one makes these adpaters, but Creative Labs included compatible adapters on their Sound Blaster Live! Audigy and X-Fi card that came with I/O Drives that fit inside a 5.25" computer case drive bay. I do not believe that Roland or Creative carry any spares in stock anymore. Here is the pinout to make an adapter cable yourself (red is ground) :


The last true Roland MPU-401 Midi Interface card was the MPU-401AT, released in 1994. This contained the interface on a small 8-bit ISA card. To communicate with external modules, it uses the same mini-DIN ports of the SCC-1. The above diagram should also work fine if you lack the proper adapter cables. The card comes with no midi module circuitry but has a 26-pin Waveblaster port to connect a midi daughterboard. Roland offered combinations of the card with its SCB-7/SCD-10 daughtercard (containing the GM-compatible circuitry of its SC-7 module) and the the SCB-55/SCD-15 daughtercard (containing the GM/GS compatible circuitry of an SC-55ST). The combinations were sold as the SCM-10AT (GM) and SCM-15AT (GS/GM). Any other waveblaster-compatible daughterboard, such as the Yamaha DB50XG and Creative WaveBlaster I or II will work well here. The SnR is better on this card than many Creative cards (which created the waveblaster standard). The MPU-401AT looks like this:


The following third party MIDI interfaces or devices have been confirmed to contain the Roland MPU-401 chipset or are 100% Roland MPU-401 compatible :

CMS CMS-401
CMS CMS-444

Midiman MM-401%

Music Quest MQX-16(s)
Music Quest MQX-32(m)*

Voyetra V-4000
Voyetra V-4001
Voyetra OP-4001
Voyetra V-22/24

* - This card has been observed to cause freezes or incorrect MIDI playback in Origin Systems games like Wing Commander and Ultima VI.

% - Has been reported to have problems with working consistently with Legend Entertainment's Gateway compared to a Roland MPU-401.

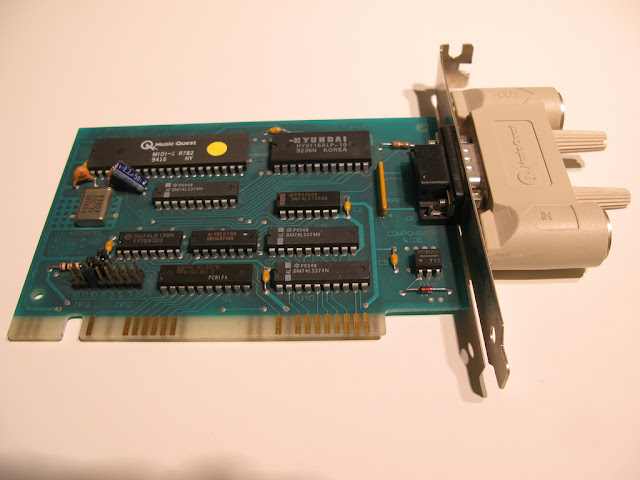
Music Quest also released a pair of basic MPU-401 compatible cards.  The pure 8-bit card looks like this :


The dongle has one MIDI in and one MIDI out.  The jumpers can select IRQ 2, 3, 5 and 7, and the jumper marked P controls the address.  If the P jumper is covered, the address will be at Address 330, and if removed it will be at address 300.

There are two ROM versions for this card.  The earlier version is v.004 and the later version is v.010.  Fortunately Music Quest marked their ROMs.  The earlier ROM will not work with Wing Commander or Wing Commander II and may have trouble with other Origin games that support the MT-32.  The later ROM will fix the problem, but requires desoldering and replacing the old ROM.   Here is a shot of a card with the old ROM for reference purposes :


Music Quest later released a version of this card with a small 16-bit connector.  All the connector did was allow you to use IRQs 10, 11 or 12.  The rest of the options remained the same as the older card.  The ROM is embedded into the microcontroller chip, and as it is a later card it would not have the problems of the ROM v.004.  


If you don't have the dongle for the card, do not despair.  You can make a dongle like the one in the second picture with this handy diagram :


A final word about other MIDI interfaces, do not bother with them. The above choices are your only guaranteed choices for DOS Games using MT-32 or compatibles. The reason why? These cards are the only cards known to guarantee to implement the MPU-401 Normal (a.k.a. Intelligent) Mode reliably. DOS Games that support the MT-32 and compatibles frequently use this mode when setting up the interface or communicating through it. Most later games, including games that are GM compatible, use the MPU-401 UART mode, which is much simpler to implement in "MPU-401 compatible" hardware. The Sound Blaster 16 and up only support MPU-401 UART mode, making them unsuitable as a reliable interface for older DOS Games with MT-32 support. The older Sound Blasters do not support MPU-401 at all. Even later Roland products, including the Roland S-MPU, S-MPU II, SCP-55 or RAP-10AT do not support intelligent mode or have problems with it. Some MT-32 DOS games will work with an interface that supports Normal/Intelligent Mode, but a true MPU-401 interface will ensure hassle-free operation.

There are cards that try to fool games into thinking that an intelligent MPU-401 interface exists by sending an ACK byte in response to every command to the MPU-401.  However, the actual command sent to the MPU-401 is not processed.  This works for most games, but not games from Legend Entertainment, whose MPU-401 usage cannot be defeated by such simple tricks.  Cards with this functionality incldue the Ensoniq Soundscape ISA series, the Yamaha SW-20PC and the MediaTrix AudioTriX Pro.

Even if you have a true MPU-401 Interface, if your computer is too fast, your game may be sending MIDI data to the MT-32 or compatible faster than the module can handle. This is the cause of the dreaded Exec. Buffer Overflow (first gen MT-32s only) and the Exec. Checksum Error (all modules). The first is very common in faster computers, the second is a lot less common. Expect either issue if you are using an MT-32 with a Pentium III computer (the last that generally had ISA slots as standard).

Method Number 2 : DOSBox

(a.k.a. the easy way out). DOSBox is an PC emulator that concentrates on getting DOS games to work. It emulates a lot of video and sound cards. It also emulates an MPU-401 interface, including the Normal/Intelligent Mode. For MT-32 and compatibles and GM/GS/XG modules, the emulation is superb. Considering that DOSBox takes the need for a Roland MPU-401 Interface and a computer with ISA slots out of the equation, it is easy to see why people prefer it. DOSBox is mostly a matter of configuring software, but a Midi Interface is still required.

This part of the guide will only consider DOSBox MIDI interface support in Windows operating systems, since that is all I am familiar with. In order to work with DOSBox, your sound card must have its MIDI drivers installed in Windows. On-board sound chips on modern motherboards tend not to support external midi. If you have a chip or a sound card that does, it generally will connect through the DA-15 game port. If you have a midi/gameport in your computer or on your card, you will need a gameport midi cable. Creative Sound Blaster cards also can use the I/O Drives or external breakout boxes that have midi ports on them.

If your audio device will not support an external midi connector, then you can use a USB MIDI adapter. However, you have to be picky, as not all USB midi adapters are created equal. I have used a Roland UM-1X for years and never have had a problem. Unfortunately it has been discontinued. Some USB MIDI adapters have had problems being able to transmit system exclusive messages to an MT-32, which is what DOS Games use create custom sounds with the MT-32.

Having obtained some kind of MIDI interface with support for external modules, connect the MIDI OUT cable to the MIDI IN port on the MT-32 or compatible module. That completes the hardware assembly. Having properly installed your drivers for your midi product, you need to set the Windows midi device to use external interface. In Windows XP, go to your Control Panel and click on "Sound and Audio Devices". Under the "Audio" tab, go to the Midi dropbox and select the name of your external device. Usually it is quite evident. Press the OK button. Under Windows 98, go to your Control Panel and click on "Multimedia". Under the MIDI tab, in the Single instrument box select the name of your external device. Press the OK button. This completes your Windows configuration.

Since Microsoft, in its infinite wisdom eliminated the selection of midi devices in the Control Panel in Windows Vista & 7, you have to select the MIDI device to use program by program. To do this in DOSBox, start DOSBox up and enter the command "mixer /listmidi". This command will show you all the MIDI devices available in your system. Make a note of the number next to the name of the external midi device. Go to your dosbox.conf file, and under [midi] there will be a line that says "midiconfig=". Enter the number of your MIDI device as DOSBox reported it after the =, save the configuration and DOSBox will use your external MIDI interface instead of the Windows default midi. If the external device is the only other midi device other than the Windows GM/GS synthesizer, then the number will be 1.

DOSBox configures its settings through the dosbox.conf (really a text) file or through a shortcut under its program folder in the start menu. Open the config file up and make sure [midi] that "mpu401=intelligent" is there. It should be by default I believe. Once that has been done, start DOSBox and configure your game to use MT-32 for its music and/or sound effects. Exit your game's configuration program, start the game and get ready to listen to some great music. Watch the MT-32 display for midi messages and make sure that there are no errors in transmission. If you are getting buffer overflow errors on a first gen MT-32, adjust the machine cycles down by using Ctrl F11. 2000 cycles should be good to start, and if you are not using a joystick you can increase them later in the game.

Currently there is a good Roland MT-32 and CM-32L emulator called Munt.  Munt is a device that emulates an MT-32 or CM-32L in software on a modern machine.  It requires the PCM ROM and Control ROM from an MT-32 or CM-32L.  You should dump your own, or if you own one of these devices you can find it without too much difficulty on the Internet.  Once installed and configured with the appropriate ROM set, it will show up in DOSBox's mixer /listmidi and you can use it by setting the MIDI device.

Tuesday, March 9, 2010

The Challenge and Reward of Running DOS Games

DOS Games can be among the most difficult video games to get running.  Even if you get the game running, you still have to consider things like getting the sound working or calibrating the joystick. 

A DOS Game is about the whole experience, from procuring a game to reading the documentation, installing the game, configurating the OS and software as need be, and finally running it.

The first point is that any DOS game originally came on floppy disks or on CDs.  They generally came in a box with at least an instruction manual and a reference card.  The instruction manual told you how to play the game, the reference card how to install the game.  Somewhere inside the package would be the means to pass the copy protection question(s) the game would ask, if any.  If the game had disk-based copy protection, the original disk(s) would be required to play the game. 

I dislike the modern way of packaging DOS Games, namely as directories after a full install.  There are games that only install certain options from the floppies.  Other games have lesser-used options that tend to get left out of the configuration options.  By only giving the resulting install, the options are limited to whatever the distributor thinks the gamer should play.  Giving disk images is the best way to ensure that a game can be installed properly on any system, real or emulated.

Second, in order to play a game, you have to have a basic understanding of how the operating system works. 

Sunday, February 28, 2010

Perfecting the IBM Model M Keyboard

The IBM Model M Keyboard is among the best keyboards ever made.  However, technologically it has shown its age a bit, and even IBM cut a corner or two to reduce the cost of production.  If I had the means, I would make the following improvements:

1.  Make a 103-key Keyboard. 

Some people like to have Windows keys.  Sometimes even I can see their utility.  Windows + D makes a good "boss key".  Learing how to use the key combinations can make working in Windows more efficient.  However, I would prefer a longer spacebar than Windows keys the same size and Ctrl and Alt.  The 101-key Model M has empty spaces, the size of a regular key, in between each set of Ctrl and Alt.  Why not put Windows key in those spaces?  People who hate the Windows key can easily disable it in software.  For Macintosh users, perhaps an option could be made for a shorter spacebar and a "Windows" key the same size as the Ctrl and Alt keys.  On no account would I want a Menu key cluttering up the row, that key's function can be replicated by Shift F10.  However, should one want one, a standard size keycap with the Menu graphic can be included if one was willing to sacrifice a Windows key. 

2.  Improve the internal assembly

The assembly of the Model M, once the keycaps and keystems are removed, is one plastic layer with holes for the keys, three membrane layers, and a metal back.  The greatest dangers to the Model M, regardless of version, are liquids.  I spilled some wine into my Unicomp Model M, and despite the drain holes, the conductive membrane was ruined.  Later, I spilled a little G2 into my 1987 Model M and the B and M keys would give VB and NM when pressed.  In the latter case, I was able to open keyboard up and save the keyboard by wiping up the liquid.  The membrane is NOT internally sealed, nor can it be, but the membrane itself is three sheets of translucent plastic that could easily be replaced. 

The problem with replacing the membrane is that IBM secured the upper plastic layer to the metal layer by melting the upper plastic layer through holes in the membrane and metal layer (in the assembly) and letting the melted plastic cool into studs on the bottom of the metal plate.  There are lots of these plastic nubs throught the back of the keyboard assembly.  The issue is that the can break after a hard impact or by wear over time.  Once all are broken off, there is no way to resecure the plastic layer to the metal layer.  At that point, you had best buy a new keyboard. 

The solution is to use screws instead of melted plastic.  This way the user can unscrew the keyboard and clean or replace the membrane.  I believe this is how the Tandy Enhanced Keyboard operates.  (A nut should be used.)  Yes, it increases costs, but I believe it is better to extend the life time of the investment.

3.  Improve the controller

The Keyboard controller circuit has some issues.  First, it only supports AT & PS/2 style connections.  Since the AT connection is a thing of the past and the PS/2 connector is a legacy port on modern motherboards, the controller should add USB support.  Second, some Model Ms have controllers than can work with the original IBM PC and IBM PC/XT and (with a custom an adapter) the IBM PC Portable (before 2nd BIOS in the latter two cases).  Most do not, I do not have any that do.  I would love a truly IBM PC Compatible keyboard.  The Tandy Enhanced Keyboard works perfectly with an IBM PC 5150 and with any other true IBM PC-compatible computer. 

The IBM Model Ms I have ## 1390120 (ledless), 1390131 (silver logo), & 1391401 (grey oval logo) have a 6-pin RJ-45-like port on the rear to attach a cable.  IBM generally supplied AT & PS/2 cables, coiled.  Why not make a sturdy USB cable?  Since only four pins are used, the other two can tell the controller that a USB cable is being attached.  While there are AT-PS/2 adapters and PS/2-USB adapters (and vice versa), permanency is prized by some people. 

Finally, why not have a wireless dongle attachment?  If it attaches to the back, another dongle can attach to the PC.  Rechargeable through USB. 

4.  Add support for N-Key and 6-Key Rollover

The Model M does not support N-key Rollover.  In fact, depending on the keys pressed, it cannot register three keys at the same time.  Try pressing r y u all at once.  Unlimited key rollover is supported through the PS/2 interface, but only 6-key rollover through USB.  6-key is not that terrible, after all the functional limit is 10 keys unless the user is a rare polydactyl with a functioning extra finger.  In order to have unlimited N-key rollover, each key on the membrane needs to be isolated with a diode.  As this is rather difficult to achieve with a thin plastic membrane, please see my next suggestion.

5.  Use Printed Circuit Board Contacts

The IBM Model F keyboards used a Printed Circuit Board with key contacted etched in the board, and the key mechanism used a carbonized switch to conduct electricity between the two halves of the contact.  This denoted significantly higher build quality.  Also, it gives an easy platform to install the diodes needed for N-key rollover.  Get rid of those flimsy plastic membranes which true rubber domes use. 

6.  Fix the layout shortcomings

The IBM Model M keyboard had a few shortcomings over the older Model Fs.  One, the function keys were relegated to the top instead of the side of the keyboard.  Savvy keyboard users with the space can use extra function keys, so add a set of function keys on the left side of the keyboard.  F11 and F12 would go to the left of the top function key row.  This is nothing new, the Northgate Omnikey Ultra and Ultra T featured two sets of function keys in this fashion.

The ~` and Esc key can be exchanged using removable keycaps, so no adjustment need be made there.

Some people prefer that the L. Ctrl should be where the Caps Lock key is on a Model M.  All that is required here is to make a Caps Lock keycap and a Ctrl key (since the Model M's Caps Lock has cap and stem fused together).  I would also make two models of Ctrl key, one with the lowered area (so people would not strike it by trying to hit the A key) and one without.  Also, why not make a Caps Lock key without the lowered area. 

L shaped Enter key?  I have no particular views toward or against the big L shaped Enter key, which was a staple of the AT Model F keyboard.  But since it replaces the | \ key, the usual alternatives are not very good.  One option is to put it to the left of the Backspace key, which requires that key to be shortened.  I have never liked this option, which is perhaps the AT Model F's biggest shortcoming.  The next option is to put it to the right of the Shift key, ala the Northgate Omnikey Ultra and Avant Stellar Prime, which is better but unlike a laptop we are not pressed for space here.  The best place to put it is where one of the Windows keys go.  I do not feel that sacrificing a Windows key to be that great of a loss.

7.  Make the Keyboard Fully Programmable

While the keyboard can be reprogrammed in software, there are times when the keycodes being reported from the keyboard to the system would actually match what the key cap indicates.  This is especially true when you have reconfigured your keycaps to match a DVORAK or AZERTY layout.  No need to load drivers or special software.  Volatile memory on the keyboard contoller should be used to indicate which scancode it outputs for each key, so the programming can be platform independent.  A USB cable may need to be used for the programming option.

Friday, February 26, 2010

Famicom AV: Best Overall Choice for the running NES & Famicom Cartridges


I am a real fan of the Nintendo Entertainment System.  This little gray box is the reason why we still play video games today  We have not forgotten about it, we still enjoy playing many, many of the approximately 750 unique North American games released during the console's lifespan.  While there is something to be said for emulating the games, there is nothing quite like playing on a real system connected to a television screen. 

Using the NES today has one problem, but it is a big one, the gray box (which in enthusiast circles is called the front loader) is terribly unreliable.  Back in the day, the push-in-and-down cartridge slot caused stress on the connectors.  Eventually obtaining and maintaining good contact between the 72 pins of the cartridge and the connector was no longer guaranteed.  If contact was broken, then the game would fail to start or crash.  On pressing the power button, if you saw a blinking screen or a solid screen of one color, that meant there was not good contact between the cartridge and connector. 

Two other issues exacerbated this unreliable mechanism.  First was the NES lockout chip.  The lockout chip inside the cartridge communicated with the one inside the system, and if the could not establish or maintain their delicate serial communications, the system would reset about twice a second.  This meant flashing screens.  Second, children discovered that by blowing on the contacts of the cartridge or system, they could often disperse the dust causing the faulty connection.  The side effect is that the saliva being blown onto the cartridge connector would, over time, corrode the contacts.  Hence more unreliable connections. 

Many companies sell replacement cartridge connectors or refurbished NES units.  There are issues here too.  First, all connectors are not created equal, and many of them are so tight that you practically need a pair of pliers to extract the cartridge when you want to change a game.  Second, the tightness of the connectors causes them to wear out more quickly than looser connectors.  Eventually, the connectors will wear out.  Refurbishing the connectors yourself requires a lot of time and the patience to slightly bend pins back to give a proper connection. 


Fortunately, there are other options.  First is the Redesigned NES, better known as the Top Loader.  The Top Loader was released at the end of the NES's life in 1993 as a cheap, entry level system.  It was a seriously cost reduced design.  Gone is the lockout chip and the unused expansion port.  As its nickname suggests, the cartridge slot consists of a vertical slot and a dust cover.  The PCB is as simplified as it gets without getting rid of any essential components.  Games tended to work much more reliably in the vertical slot, no extra stress on the pins from having to rotate the cartridge to make contact with both sets of pins in the slot. 

Two issues developed with the Top Loader, one major, one minor.  The minor one apparently is that it would not work with certain unlicensed games that relied on the presence of a lockout chip and defeat it before the game would work  I have never been able to confirm this, except for the licensed rarity known as the Nintendo World Championships 1990 cartridge.  The Game Genie's PCB may be too thick to fit inside the slot, and there was an adapter to make it work, but it is now extremely rare. 

The major issue is that the Top Loader has the worst video quality of any official NES-compatible hardware.  Vertical lines run down the screen every other pixel it seems.  This is especially apparent on backgrounds of certain solid colors, which is common on older NES titles.  Add to this the R/F only output, (whereas the front loader has composite video as well), and you have a serious barriers to oldskool enjoyment. 


Before releasing the NES in the United States, Nintendo had already enjoyed great success with the basic hardware, the Famicom, in Japan.  The Famicom and NES are virtually identical from a programmer's perspective.  Hardware-wise, they use different cartridge connectors, the Famicom uses a 60-pin connector while the NES uses a 72-pin connector.  Using US cartridges on a Famicom requires a 72-60 pin converter.  Other disadvantages of using a Famicom is that the controllers are hardwired to the system and the cables are very short.  The cables tend to be approximately 3' long whereas NES controllers are 6' long. Replacing worn out controllers is not as easy as it is for the NES.

The other big issue with using a regular Famicom is that the R/F signal was designed to be tuned to Japanese standards, which are just different enough from US standards to be annoying.  While a regular NES or other console RF system tunes to channel 2, 3 or 4, you need to set your TV to channel 95 or 96 to get the proper frequency for the Famicom's RF signal.  Not all TVs can do that, although more modern ones can more easily.  The Twin Famicom by Sharp (designed by Nintendo) has the same problems but has a Famicom Disk System inside the unit.

More interesting is the Sharp Famicom Titler.  While it has the attached controllers, it also has composte and S-Video outputs.  While they provide a sharper picture, they have graphics issues.  Normal US NES and Famicoms use a 2C02 Composite Video PPU, the Titler and the Playchoice-10 devices use a 2C03 RGB Video PPU.  The Titler has a chip that converts the RGB output from the PPU to S-Video, composite video and R/F video.  The 2C02 cannot output a good S-Video signal because the luma and chroma signals are mixed within the chip.  The RGB PPU generates graphics with some differences from the composite PPU, leading to issues.  The RGB and Composite palettes are generally similar to each other but there are color differences.  The Composite PPU can generate more gray shades than the RGB.  Games like The Immortal will not show graphics on the RGB PPU because they use a feature (color emphasis bits) that works as intended on the Composite PPU (diming the brightness generally) which will give a solid white screen on an RGB device. 


Finally, let me discuss the Famicom AV.  This unit was first released in 1993 or 1994 just as Nintendo was ready to stop producing games for the Famicom.  It is the smallest true Nintendo NES/Famicom device.  Because of its relative newness, you can find them in good shape. 

It uses the Nintendo Multi-Out A/V connector that the SNES, N64 and Gamecube use.  (The RGB and S-Video cables will not output video).  Unlike the first model SNES, it does not have an R/F output, but the Nintendo RF adapter which plugs into the Multi-Out should work.  It uses the same power requirements as a SNES power adapter but the plug which it expects is different.  The system did not come with a power adapter as it was assumed the purchaser would use his or her original Famicom power adapter.  The adapter for a Sega Master System or Sega Genesis Model 1 fits and works perfectly with the Famicom AV.  The adapter's ratings are DC 10v, 850mA, center tip negative.

The Famicom AV is chiefly distinguished by its video quality.  It has the best true composite output of any other NES/Famicom.  With licensed and unlicensed cartridges, the vertical stripes are non-existent.  Even on the front loader NES they can be visible at times.  The audio is still mono as with any unmodified NES/Famicom; each audio outputs jack on any cable will output the exact same sound. 

The Famicom AV has the same two controller ports as found in the NES.  It also comes with two "new-style" (dogbone) controllers.  I personally prefer to use dogbones over the original old-style rectangular NES controllers because they are more comfortable to hold in your hands over an extended period of time and the concave buttons are easier on the thumb than the convex buttons of the old-style controller.  However, the controllers that come with the Famicom AV only have a cable length of 3 feet, NES controllers have 6 foot cables.  Gamers in Japan generally have less room than US, so the cable lengths are shorter.  Top loader NESes came with 1 dogbone controller, but it had a 6 foot cable length. 

The Famicom AV, just like the original Famicom, supports all official Famicom cartridges, including ones that have extra sound hardware within.  It also supports the Famicom Disk System.  However, games that made use of the microphone on the second attached original Famicom controller will not be able to make use of that functionality.  Fortunately, the functionality is not important in any game a non-Japanese person is likely to play.  The Legend of Zelda uses it to kill the Pols Voice monsters, Kid Icarus to lower the shopkeeper's prices.

The more important limitation of the Famicom AV's second controller port is that it does not support the NES Zapper or the Arkanoid NES Vaus Controller.  The reason why is because there are two data lines which are connected on the NES's second controller port but not on the Famicom AV's.  Fortunately, soldering two wires inside the unit can fix this, if you are brave enough to take an iron to the Famicom AV.

Playing NES games with the Famicom AV requires the player to use a 72-60 pin converter between cartridge and console.  These used to be very difficult to find.  60-72 pin converters (they have ribbons attached) were much more common because more people were interested in playing Famicom games in their NES than vice-versa.  However, with the greater availability of Famicom clones, 72-60 pin converters have become more available.  Even so, not all are created equal.  The "Family Converter" works perfectly with all NES cartridges, but it is no longer in production.  More recent converters tend not to connect certain pins on the bus to the Picture Processing Unit & Video RAM inside the NES.  While this is okay for almost all released NES games, 10 games (including Gauntlet, After Burner & Castlevania III) will be unplayable due to graphic errors.  The PowerPak also will not work with cheap converters.  With some soldering and trace cutting on the converter, this problem may be fixable.  

Having explained the caveats, I still maintain that the Famicom AV is the best way to go to play commercial NES and Famicom games.  You will enjoy the best overall experience.

Wednesday, February 10, 2010

Choices for Roland LA Synthesis

My principal interest in PC games generally begins at the "true" DOS games era, which began roughly in 1987.  Before that time, most games published for the IBM PC platform were ports from other systems.  Most games published prior to that time did not require DOS to run, they booted off a floppy disk when the machine was turned on.  Games generally supported the Color/Graphics Adapter (CGA), most often capable of four colors, and the PC Speaker, a mono device without a volume control that could change the frequency of a simple square wave.  If these games supported more advanced  graphics or sound options, the user needed a special system to enjoy these features.  The special systems, most typically the IBM PCjr. and Tandy 1000 line, had less than 100% compatibility with the IBM PC. 

In 1988 games that supported the sixteen color Enhanced Graphics Adapter (EGA) began to really emerge in the marketplace.  While some games had appeared in the previous years, 1988 marks the first year when, unless you had a Tandy, you really should have bought a PC with EGA card inside it.  Also in 1988, sound cards finally began to be supported by the major gaming companies.  Many early cards competed for a coveted expansion slot in a user's computer, but only two really gained any market acceptance.  The first was the Adlib card.  This card contains a Yamaha sound chip that works via frequency modulation (FM) synthesis.  As it was reasonably priced ($190) and offered far better sound than the PC Speaker or the Tandy/PCjr. sound chip and could be installed in any computer with an available slot, it rapidly became the sound card of choice. 

On the high end, game developers had begun to support Roland Corporation's MT-32 multitimbral sound module.  This was an external midi sound module that interfaced to the computer through an MPU-401 interface card and breakout box.  This device was intended primarily for computer composers and cost approximately $600 between the module and the interface.  However, the synthesis method used, LA synthesis, produced sounds far better than the Adlib's chip.  What is more, the user could program his own sounds into the unit and make music with it from a physical keyboard.

Thus, there were choices for both types of computer user.  Many, many games supported both devices.  The music quality generally was far more impressive on the MT-32 than an Adlib.  Soon, however, there was competition in this area.  Creative Labs' Sound Blaster cards quickly eclipsed the Adlib by using the same chip and adding a midi/joystick interface and digitized sound playback and recording at around the same price.  The lack of standardization in the midi world in which the MT-32 was designed was solved when the General Midi standard became effective.  Once GM devices began to proliferate, companies quickly abandoned the prickly MT-32.

The MT-32 and compatible modules may have been resigned to obscurity, and the games which used them to obsolescence, if not for the DOSBox emulator and the retro computing hobby.  The DOSBox emulator has long supported games which use the MT-32 by emulating an MPU-401 interface.  By connecting a physical unit to the modern machine's midi hardware (I use the USB Roland UM-1X), the music will play through the unit just as it would through a classic computer.  Retro computer enthusiasts bypass the emulator and use a hardware MPU-401 interface. 

No longer having to settle for Adlib music or having to pay extreme prices for the hardware, what is a lover of DOS games to do?  There is an MT-32 emulator called Munt.  While it is always in development, the current versions of the emulator sound very good and often indistinguishable from the real thing. Moreover, it can also emulate the CM-32L/LAPC-I and its extra sound effects.  But if you are committed to real hardware, let this post act as a guide.

The MT-32 and all compatible devices are based off Roland's LA32 chip and there are only eight devices that are truly compatible.  In addition to the MT-32, there is the CM-32L, CM-32LN, CM-64, CM-500, MT-100, LAPC-I, LAPC-N.  Having had personal experience with all but three of these devices in the past decade, I would like to give the pros and cons of each:

First Generation LA32 Synthesis

The first generation devices are very speed sensitive.  They required a 40ms delay between sending midi messages.  While this was fine on a 286 machine, the speeds of a 486 and higher 386s would cause the game to send messages too quickly, leading to Buffer Overflows, stuttering or wrong sounds and lockups.  The first generation devices are noticeably noisier than the later generations.  However, a few games from Sierra and other companies exploit bugs in first generation devices to produce sound effects which the later generation devices will not play correctly.

MT-32


This is the original module, and it has 128 preset instruments and 30 rhythm sounds.  It also has memory for 64 user-defined sounds which the musician sends via sysex.  It has 9 parts, with each part set to a different instrument and supports 32-note polyphony.  All external modules have three standard midi ports, one IN, one OUT and one THRU.

It has a twenty character LCD display which many games used to send cute text messages via sysex.   It has a buttons on the front to control various part parameters.  It can control the volume of each part as well as the overall volume digitally.  There is a key combination (press Master Volume and Rhythm at the same time, then press the 1 Button) to reset the module without turning it off.  There is also a diagnostic mode.  You can even see the Control ROM version info.  This module has 1/4" left and right audio output jacks. 

One lesser known difference between the early MT-32 and later modules is that the volume control knob sets the volume digitally on the early MT-32.  The later modules with volume control knobs set the volume at the analog amplifiers.

Second Generation LA32 Synthesis

These modules sound less noisy than the first generation modules.  They no longer require a delay between midi messages.  This means they are suitable to be used with any computer system, regardless of processor speed.  Some games will only work with second and third generation devices because they do not delay their midi messages. 

MT-32

The second generation of the MT-32 has a 1/4" stereo headphone jack.  All modules following will have right/left and stereo headphone 1/4" jacks.  The late MT-32 also contains demo tunes not present in the CM/LAPC series or the early MT-32s. 

MT-100


This module is a bit more obscure than the others in this category.  It is a combination of the capabilities of an MT-32 (minus some controls) and the Roland PR-100 sequencer.  Its status panel only displays eight characters at a time (as opposed to the MT-32's twenty character display) and will NOT display sysex messages.  Although its disk drive looks like a standard 3.5" drive, it uses 2.8" Quick Disks.  These are the epitome of rare media in this country. 

LAPC-I


This is the only LA32 device that is found on a PC expansion card.  This is an 8-bit ISA (f.k.a. XT bus) card.  It is 13" long, which is the maximum length of a PC expansion card.  It can be connected to an MCB-1 midi expansion box to interact with external devices.  This card adds 33 sound effects to the MT-32's capabilities, and certain DOS games used these sounds.  It also has a Roland MPU-401 interface on board, which many MT-32 compatible DOS games require to produce MT-32 sounds.  This makes it a very valuable card to retro computing enthusiasts. 

This card has left and right audio RCA jacks and a stereo 1/8" minijack.  Its MCB-1 has four midi jacks, 1IN, 2 OUTs and a SYNC.  The OUTs can become THRUs by programming the MPU-401 interface.

In addition to requiring a unobstructed full-length ISA slot (it won't fit inside any Tandy 1000, for example), this card also requires a -5v power source.  Modern ATX (2.0 or above) power supplies do not offer -5v power, and many computer cases cannot house 13" cards.  These problems are not new, however, as Tandy 1000 compatible machines cannot accept 13" cards and sometimes do not supply -5v power.  As this is an ISA card, it is more susceptible to electrical noise from the rest of the PC, but I have never read of any serious complaints. 

It may be possible that the earliest LAPC-I cards may not have jumper blocks to allow the user to select the I/O ports and/or IRQ to be used for the MPU-401 interface.  I have never seen a card lacking them.  Besides, many games expect a Roland MPU-401 to use I/O 330-331 and IRQ 2/9 and fail to work if the card isn't using those resources.

Because of this card's MPU-401 interface, Windows XP and older OSes can detect and install the card as a midi device.  DOSBox can use it directly in this fashion as can DOS games run in a DOS window.  If your DOSBox machine lacks ISA slots, you may wish to look at a USB2ISA adapter, but they are expensive and whether the card will work with such an adapter is uncertain.  Instead, you should stick it in a retro computer and connect your modern machine's midi interface to the MCB-1 midi box. 

If you use this method, in order to avoid resetting or restarting the retro machine every time you play a new game, you will need to send a reset command through a sysex program or embedded in a midi file.  However, by default the MPU-401 interface will not transmit sysex from the MCB-1 to the LA32 synthesis component on the card.  From the retro computer, you will need to run a program called MPUTHRU to instruct the MPU-401 interface to allow sysex messages to be accepted and sent to the LA32 component. 

CM-32L


This module has the same hardware features as the LAPC-I, minus the MPU-401 interface.  All the CM modules only have an analog volume control knob on the front of the unit, no display, no buttons to change parameters.  To reset these modules, you have to turn them off and back on, send a sysex message or play a midi file with the reset command embedded within. 

CM-64


This module has a CM-32L board and combines it with a CM-32P board, all in a plastic enclosure the same size as either unit.  The CM-32P uses PCM (pure samples) synthesis and has a slot to insert cards that will add additional sounds.  These modules are designed to co-exist, with the CM-32L using midi channels 2-10 and the CM-32P channels 10-16.  No DOS games are known to intentionally support CM-32P features.  Because there are two PCBs in this enclosure, the resulting noise floor is higher than using the CM-32L.  There is also an annoying feature: games that are not CM-32P/CM-64 "aware" and send data to the midi channels reserved to the CM-32P will produce unintentional, obtrusive sounds.  Sierra's titles from 1988 and early to mid 1989 suffer from this problem, fortunately you can use drivers from later games in all instances except early versions of King's Quest IV and Leisure Suit Larry II.  If you have one of these games, you can send a MIDI message to turn channels 10-16 off.

LAPC-N


This is just like the LAPC-I, but it is designed for the Japanese PC-98xx series of computers.  It uses the C-bus, which is similar to the ISA bus of the IBM PCs but utterly useless on them.  The only practical value this rare device may have for PC games is if you use it with its Midi Expansion Box (MCB-2), installed inside a PC-98xx machine and use the combo as a midi module.

There is a device called the C86BOX which allows you to interface with a pair of C-bus audio cards.  http://c86box.com/  The device is not cheap, but it can allow you to use an LAPC-N like an external module if you have the MCB-2 expansion.  The C86BOX can communicate with the cards by way of USB.  While the programs developed to communicate with the C86BOX are for the PSGs and FM chips found on many PC-98xx sound cards, this box will provide power to the LAPC-N.  Unlike the LAPC-I, the LAPC-N has "LA IN & OUT" ports which communicate directly with the synthesizer unit on the card, bypassing the MPU-401 interface.  You will not need a program like MPUTHRU to allow the MPU-401 to pass system exclusive messages to the LAPC-N.

Third Generation Roland LA32 Synthesis

Third generation modules have the best sound output quality to them, but the vibrato is noticeably different sounding, leading most users to prefer a first or second generation module. 

CM-500


This used to be a very prized device, as it is a combination of a Roland CM-32L and a Roland CM-300.  The Roland CM-300 is the barebones version of the Roland Sound Canvas SC-55, which is GS and (with later models) General Midi compatible.  A four-position switch on the back of the module needs to be set to use one, the other or both.  The switches are as follows:

Mode A - CM-300 & CM-32L at the same time
Mode B - CM-64 emulation
Mode C - CM-300 only
Mode D - CM-300 on midi channels 1-10, CM-32L on channels 11-16. 

Mode D is useless for DOS games that support MT-32 or compatibles, since they expect the module to use channels 2-10.  Mode C is ideal for DOS games that support General Midi, but useless for MT-32 or compatible games.  Mode B is generally useful for MT-32 compatible games, but it has the same problem as the CM-64 with regards to unwanted sounds coming from the emulated CM-32P.  Using Mode A will solve that problem, but it requires the user to send a command to turn off the CM-300 parts before starting a game.  You will not observe any results of changing the switch until you turn the device off and back on.

CM-32LN

This is another Japanese PC-98xx exclusive device, this time it was intended to connect to PC-98xx compatible notebooks through a special 110-pin connector.  Fortunately it also has standard-sized midi jacks, so it can be used with IBM PC games without difficulty.  It is also is grey in color, unlike the beige look of the rest of the CM modules.

Conclusion

If you want a module that just works with everything without any fuss, I would suggest a CM-32L.  If you have a retro machine that can fit the card, try to get the LAPC-I, but they are not cheap anymore.  If you want the best of both worlds, however, a combination of a first generation MT-32 and a CM-32L would work perfectly.  If you also want GM/GS compatibility and not a bunch of modules cluttering your house, try for a CM-500.  As far as places to buy, eBay is the obvious place but you should also consider Japanese Auction sites as well for some deals.